Table of Contents
ZynAddSubFX Manual
I've taken the liberty to convert most of the ZynAddSubFX documentation available on the ZynAddSubFX SourceForge site to Wiki format. In the process I've tried to correct spelling and grammatical errors and I've made new and up to date screenshots using ZynAddSubFX 2.4.1 release. So none of the following documentation has been written by me, it is all the work of the original author of ZynAddSubFX, Paul Nasca Octavian. This manual is also available as a PDF and as an OpenOffice/LibreOffice Writer odt file.
AutoStatic 2011/04/27 15:12
1. Basics
This page describes the basic principles and contains suggestions on how to make instruments that sound like they have been made with professional equipment. This applies to ZynAddSubFX or to any synthesizer (even if you wrote it yourself with a few lines of code). All the ideas from ZynAddSubFX are derived from the principles outlined below.
1.1 The bandwidth of each harmonic
I am not referring to sample-rate, I am talking about the frequency “spread” of each harmonic. This is the most important principle of making instruments that sound good. Unfortunately there is very little documentation about it (I have seen it very briefly described in an old book, I searched on the net about this, but I didn't find anymore - maybe you'll help me?).
Often it is believed that the pitched sounds (like piano,organ,choir,etc.) for a single note have a frequency, it's actually harmonics and nothing more. Many people try to synthesize a sound using an exact frequency+harmonics and observe that the result sounds too “artificial”. They might try to modify the harmonic content, add a vibrato, tremolo, but even that doesn't sound “warm” enough. The reason is that the natural sounds don't produce an exact periodic; their sounds are quasi-periodic. Please notice that not all quasi-periodic sounds are “warm” or pleasant.
1.1.1 The difference between a periodic wave and a quasi-periodic wave
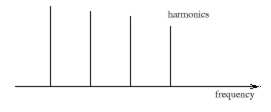
This is a graphical representation of a note with exact frequency (bandwidth of each harmonic is too narrow; the sound is periodic). Below that the corresponding spectrum.
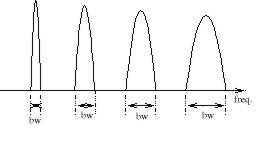
This is a graph of a quasi-periodic sound, below the corresponding spectrum (the bandwidths are exaggerated).
Click here to listen to a sample of periodic wave followed by a quasi-periodic one.
A very important thing about the bandwidth is that it has to be increased if you increase the frequency of the harmonic.
If the fundamental frequency is 440 Hz and the bandwidth is 10 Hz (that means that the frequencies are spread from 435 to 445 Hz), the bandwidth of the second harmonics (880Hz) must be 20 Hz. A simple formula to compute the bandwidth of each harmonic if you know the bandwidth of the fundamental frequency is BWn=n*bw1 ; n is the order of the harmonic, bw1 is the bandwidth of fundamental frequency and BWn is the bandwidth of the n'th harmonic. If you do not increase the bandwidth according the frequency, the resulting instrument will (usually) sound too 'artificial' or 'ugly'.
There are at least three methods of making good sounds with the above considerations:
- by adding slightly detuned sounds (in ZynAddSubFX it is called ADsynth). The idea is not new: it has been used for thousands of years in choirs and ensembles. That's why choirs sound so beautiful.
- by generating white noise, subtracting all harmonics with band-pass filters and adding the results (in ZynAddSubFX it is called SUBsynth)
- by “drawing” the above graph that represents the frequency amplitudes on a large array, put random phases and do a single IFFT for the whole sample
1.2 The randomness of the sound
The main reason why the digital synthesis sounds too “cold” is because the same recorded sample is played over and over on each key-press There is no difference between a note played the first time and second time. Exceptions may be the filtering and some effects, but these are not enough. In natural or analogue instruments this doesn't happen because it is impossible to reproduce exactly the same conditions for each note. To make a warm instrument you have to make sure that it sounds slightly different each time. In ZynAddSubFX you can do this:
- In ADsynth, set the “Randomness” function from Oscillator Editor to a value different than 0 or change the start phase of the LFO to the leftmost value
- In SUBsynth, all notes already has randomness because the starting sound is white noise
- In PADSynth, I start the sample from random positions on each keystroke
1.3 Decrease the amplitude of higher harmonics on low velocity notes
All natural notes have this property, because on low velocity notes there is not enough energy to spread to higher harmonics. On artificial synthesis you can do this by using a low-pass filter that lowers the cutoff frequency on notes with low velocities or, if you use FM, by lowering the modulator index.
1.4 The spectrum should be almost the same according to frequencies and not harmonics
This means that, for example, the higher the pitch is, the smaller the number of harmonics it will contain. This happens in a natural instrument because of the resonance.
In this case there are many instruments that don't obey this, but sound quite good (example: synth organ).
If you record the C-2 note from a piano and you play it at a very high speed (8 times), the result will not sound like the C-5 key from the piano. The pitch is C-5, but the timbre is very different. This is because the harmonic content is preserved (I mean the n-th harmonic will have the same amplitude in both cases) and not the spectrum (eg. the amplitudes of the harmonics around 1000 Hz are too different from one case to another).
In artificial synthesis you can use filters to add resonance or FM synthesis that varies the index according to the frequency. In ZynAddSubFX you can add the resonance:
- In ADsynth, use the Resonance, a high harmonics sound content and filters or FM
- In SUBsynth, you can add some harmonics and use the Global Filter
2. ZynAddSubFX components
Important: All indexes of MIDI Channels, Parts, Effects starts from 0, so, for example, the first Part is 0.
Below is a picture that represents the components of the ZynAddSubFX synthesizer.
ZynAddSubFX components:
- Parts - they receive the note messages from MIDI Channels. You may assign a part to any channel. A part can store only one instrument. “Add.S” represents ADsynth and “Sub.S” is SUBsynth.
- Insertion Effect - this effect applies only to one part; you can have any number of insertion effects for one part, but the number of these cannot be bigger than NUM_INS_EFX.
- Part Mixer - Mixes all parts
- System Effects - Apply to all parts, you can set how much signal is routed through a system effect.
- Master mixer - Mixes all outputs of Parts Mixers and System Effects.
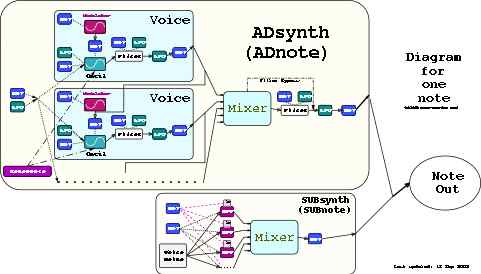
2.1 ZynAddSubFX components for a single note
The idea of this synthesis model is from another synthesizer I've written years ago, released on the Internet and named “Paul's Sound Designer”. Of course this model is more advanced than “Paul's Sound Designer” (adding SUBsynth, more LFO's/Envelopes, etc.) but the idea is the same.
The picture represents the synthesizer module components. The continuous lines are the signal routing, and the dotted lines are frequency controlling signals (they controls the frequency of something). The dashed lines controls the bandwidths of bandpass filters. “Env” are the envelopes, “LFO” the Low Frequency Oscillators, “BPF” are band pass filters, “bw” are the bandwidth of the BPF's.
If you use instrument kits, the “note out” represents the output of the kit item.
3. ZynAddSubFX user interface and more
The synthesizer has three types of parameters:
Master settings/parameters - contains all parameters (including effects, instruments)
Instrument parameters - contains ADnote/SUBnote parameters for a part
Scale settings - contains the settings of scales (ZynAddSubFX is micro-tonal synth) and few other parameters related to tunings
3.1 Envelope window
The envelopes are parts that control a parameter (frequencies) of a sound.
FreeMode - enable the FreeMode mode of the envelope. If an envelope has the FreeMode mode enabled, it allows you to edit the graph of the envelope directly. Select a point from the graph and move it. Notice that ONLY THE LINE BEFORE THE CURRENTLY EDITED POINT OF THE ENVELOPE changes its duration. If a point is being dragged, the text on the right, shows you the duration of the line before it. Otherwise, the text shows the total duration of the envelope.
If the envelope doesn't have the FreeMode mode enabled, it doesn't allow to move the points; the envelope window is useful to see what happens if you change the ADSR settings.
Add Point - add a point after the current point
Delete Point - delete the current point
Sust - set the sustain point. If the point is 0, the sustain is disabled
Str.- Envelope Stretch
L - if the envelope is Amplitude Envelope, it makes the envelope Linear, otherwise, it's logarithmic (dB)
frcR - forces the release. When the key is released, the position of the envelope jumps directly to the point after the release point. If the release is disabled the envelope position jumps to the last point on release.
3.2 Filter Window (formant)
This window allows you to change most of the parameters of the formant filter.
Formant parameters
Num.Formants - number of formants used
Fr.Sl. - formant slowness - this parameters prevents too fast morphing between vowels
Vw.Cl. - vowel “clearness” - how much the vowels are kept “clear”; i.e. how much the “mixed” vowels are avoided
C.f. - the center frequency of the graph
Oct.- number of octaves in the graph
Vowel parameters
Vowel no - the number of the current vowel
Formant - the current formant
freq - the frequency of the current formant
Q - the Q (bandwidth) of the current formant
amp - amplitude of the current formant
Sequence Parameters
The sequence represents what vowel is selected to sound according to the input from the filter envelopes and LFO's.
Seq Size - number of vowels in the sequence
S.Pos - the current position of the sequence
Vowel - the vowel from the current position
Strtch - how the sequence is stretched
Neg Input - if the sequence is reversed
3.3 The Main Window
Main parameters
Record - Choose a file for recording. After you've selected a file, the “Rec” button will be activated, and you can press it to start recording. Press “Stop” button to stop recording and close the file or “Pause” to stop recording, but without closing the file (this allows you to press “Rec”again to continue the recording). Please do not switch windows/tasks while recording, because you may encounter audio dropouts. The file recorded is a WAV file and the recording starts only when a MIDI note on message is received.
M.Vol - Master Volume
Master Key Shift - is the key-shift(transpose) that applies to all parts
F.Det - global fine detune (-64..63 cents)
R.D. - reset the global fine detune to 0
Panel window - Shows the mixer panel window
Scales - Scale Settings
Panic! - stops all sounds immediately, including effects
Vk - shows the virtual keyboard
System Effects/ Insertion Effects - Effects settings
Part parameters
Part - show and set current part.
Enabled - enable the part. If the Part is disabled it doesn't use CPU.
Volume - Part Volume
Vel.Sns and Vel. Off. - Velocity Sensing and Offset
PartFX - Open the effects window of the Part
Instrument name
- left-click to open the Bank window
- right-click to change the name of the current instrument
KeyShift - Key-shift of the part.
Chn.Rcv. - MIDI channel that receives MIDI messages
AllNotesOff - turn off all notes of the Part
Note On - if the part receives Note on messages. Please take note that it is different than the Enabled setting, because it uses CPU, and the unfinished notes continues to play if you disable it.
ADsyn/SUBsyn - activate or deactivate Adsynth/SUBsynth
ADs edit/SUBs edit - edit ADsynth/SUBsynth parameters
Instr.kit items edit - open the items window of the instrument kit (used for layered instruments/drum kits)
To Sys Efx. set how much of the part output is routed to System effects. If you change the current Part, all instrument windows of the Part that are open eventually will be closed.
Min.k and Max.k controls the minimum/maximum NoteOn for the Part
m/R/M - set the last pressed note to the minimum(m)/maximum(M) or reset min/max defaults(R)
Poly - set the mode (polyphonic/monophonic)
Portamento - Enable the portamento (you can set the duration and other parameters by opening the Controllers window)
K.lmt - limit the number of keys that play simultaneously (first note priority), 0 is unlimited
VU-Meter
VU-Meter - click to reset
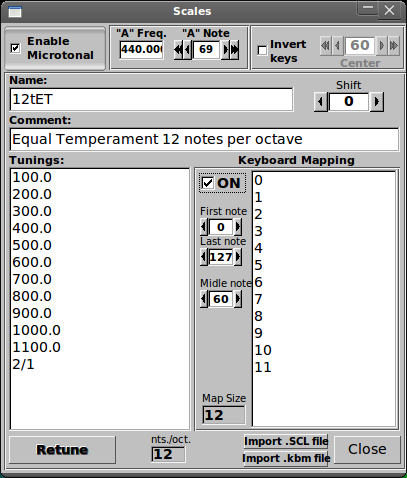
3.4 The Scale Settings
This controls the micro-tonal capabilities of ZynAddSubFX and some other settings related to tuning.
Enable Microtonal - when disabled the synth will use Equal Temperament 12 notes/octave. Otherwise you can input any scale you desire.
“A” freq - set the frequency of the “A” key. The standard is 440.0 Hz
“A” note - set the MIDI note number of the “A” key
Invert keys - When enabled, the keyboard will be turned upside-down. It was too cute an idea to not implement it.
Center - set the center of the inversion of the keys. If the center is 60, the note 59 will become 61, 58 will become 62, 61 will become 59 and so on.
Name - the name of the scale
Comment - Comments or description of the scale
Shift - shift the scale. If the scale is tuned to A you can easily tune it to another key.
Tunings - here you can input your scale by entering all tunings for one octave.
You can enter the tunings in two ways:
- as a float number like “100.0”, “123.234” by using a the number of cents (1200 cents=1 octave)
- as a proportion like “2/1” which represents one octave, “3/2” a perfect fifth, “5734/6561”. “2/1” is equal to “1200.0” cents.
The last entry represents one octave. All other notes are deduced from these settings.
Keyboard Mapping - you can set the MIDI keyboard to scale degree mapping. This is used if the scale has more or less than 12 notes/octave.
- You can enable the mapping by pressing the “ON” check-box
- The MIDI keys below “First note” and above “Last note” are ignored
- Middle note represents the note where the formal octave starts
- Input field - you enter the mappings here:
- numbers, represent the order (degree) entered on Tunings Input (first is 0). This must be less than the number of notes/octave. If you don't want a key to be mapped, you enter “x” instead of a number.
“Import .SCL file” and “Import .kbm file” - import Scala files. Scala is a powerful application for experimentation with musical tunings (intonation scales, micro-tonal,…etc.). From its home page you can download more than 2800 scales which you can import directly into ZynAddSubFX.
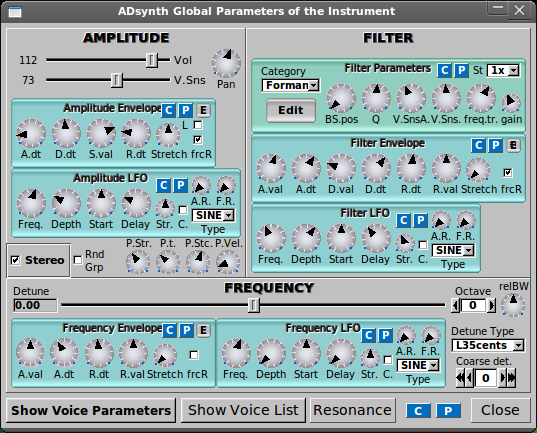
3.5 ADsynth/ADnote settings
This is the most complex, most advanced and most sophisticated part of the synthesizer and allows you to edit the parameters that apply to all the voices of ADsynth.
Vol. - the volume of ADsynth
Pan. - panning, leftmost is random
V.Sns. - Velocity Sensing
Stereo Enabled - when disabled all voices will have panning disabled
P.Str. - Punch effect strength
P.t. - Punch effect duration (from 0.1 ms to 100 ms on A note- 440Hz)
P.Stc. - Punch effect stretch according to frequency. On lower notes the punch effect lasts longer.
P.Vel. - Punch effect velocity sensing
CenterFreq. - Filter Center Frequency
Category - Filter category: Analog/Formant
Q - is the resonance or bandwidth. Some filter types ignores this.
St. - number of additional times the filter will be applied (in order to do very steep roll-off - eg. 48 dB/octave)
V.Sns.A. - the amplitude of the velocity sensing
freq.tr - filter frequency tracking
Detune. - amount of detune of all voices
C.detune - coarse detune of all voices
Oct. - Octave Shift
Type - set “Detune” and “C.detune” behavior
Show Voice Parameters - shows the parameters of current voice
Show Voice List - shows a list of some important parameters of all voices
Close - close the window
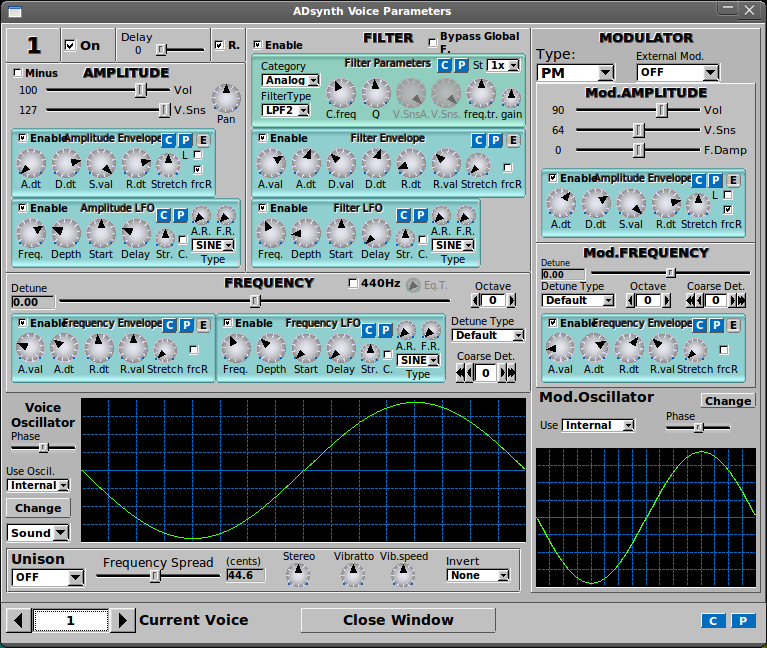
3.6 ADsynth voice parameters
On - turn voice On/Off
Delay - delay before the voice starts
R. - Enable/Disable the resonance of the voice
Vol - Voice Volume
Minus - enable negative values for the volume of the voice
V.Sns. - Velocity Sensing
Enable- enable LFO's or envelopes
Bypass Global Filter - If the voice signal bypasses the global filter
Category - Filter category: Analog/Formant/SVF
CenterFreq - filter center frequency
Q - Resonance or bandwidth
St. - how many additional times the filter will be applied (in order to do very steep roll-off - eg. 48 dB/octave)
freq.tr - filter frequency tracking
Detune. - detune of the voice
C.detune - coarse detune of the voice
Oct. - Octave Shift
Type - set “Detune” and “C.detune” behavior; 0 is for default (used in ADnote Global Parameters)
440Hz - fix the base frequency to 440Hz (you can adjust this with the detune settings)
Phase - Phase of the oscillator
Sound/Noise - select the mode of the oscillator (Sound/White noise)
Ext. Oscil. - Use the oscillator of another voice. -1 is for the internal oscillator. The parameters must be lower than the voice index, you can't use the oscillator from a voice with a bigger index (you can't use the oscillator of voice 8 for voice 4). This is very useful because if you use many voices with the same oscillator settings, you can use only one oscillator and select other voices to use this; if you change a parameter of the oscillator, all voices using this oscillator will be affected.
Type - select the type of modulator (Off, Morph, Ring Modulation, Phase Modulation,etc.)
Ext. Mod - use another voice as a modulator instead of the modulator of the internal voic. You can make a modulation “stack”. The modulator of the voice is disabled.
F.Damp - how the modulator intensity is lowered according to lower/higher note frequencies.
Ext. - Uses the oscillator of the modulator of another voice. It behaves like “Ext. Oscil” except that it works on the modulator. Please notice the difference between this parameter and Ext. Mod.
Copy/Paste - Copy to/paste from the clipboard
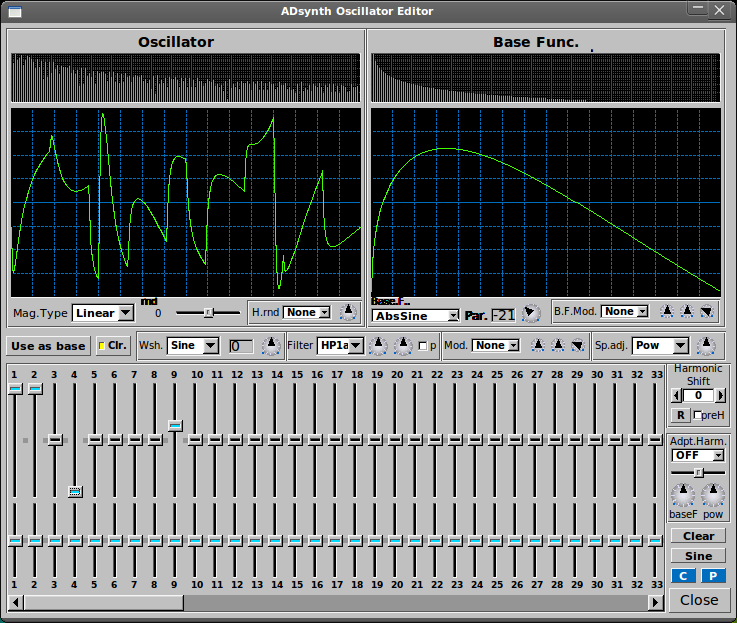
3.7 ADsynth Oscillator Editor
The Oscillator Editor allows you to create an unlimited number of oscillators.
Mag. Type - set how magnitudes from the user interface behave (Linear/ -40dB/…)
rnd - Set the randomness of the oscillator output. There are 2 types of randomnesses, first is group randomness(the oscillator starts at random position), second is from -64(max) to -1 (min) and each harmonic (the oscillator is phase distorted) is from 1(min) to 63 (max). 0 is no randomness. You could use this parameter for making warm sounds like analogue synthesizers.
Base function - Set what function to use as base function. You can use any base function as harmonics.
Par. - change the parameter of the base function.
Use as base - convert the oscillator output to a base function. Changing the Base function or its parameter will erase the converted base function.
Clr. - clear the settings and make the oscil equal to a base function. If this is cleared you can click the “Use as base” button to make multiple conversions to base functions.
W.sh. - Wave shaping function that applies to the oscillator. It has one parameter that finetunes the wave-shaping function.
Filter - Set the type of the harmonic filter
- the knob in the right sets the filter parameter (frequency)
- preF - set the order of doing the filter and wave-shaper (uncheck to filter after wave-shaping, check to wave-shape after filtering)
Sp. Adj - Adjust the spectrum of the waveform
RMS normalize - enables the RMS normalization method (recommended); this keeps the same loudness regardless the harmonic content.
Below are the harmonics and their phases. You can use them to add to oscillator harmonics that has the waveform of the base function. Increasing the number of harmonics has virtually no effect on CPU usage.
Right click to set a harmonic/phase to the default value.
Clear - clears the harmonics settings.
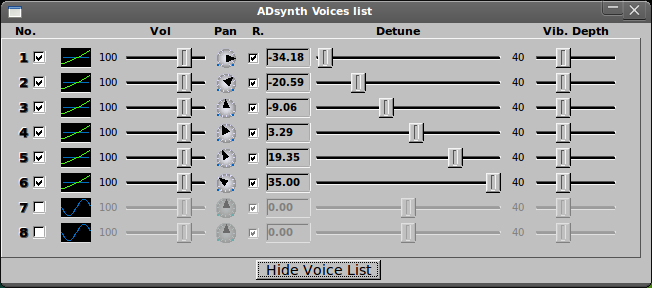
3.8 Voices list
Within this window you can set the most important parameters of the voices.
Vol. - set the Volume of the voice
Pan - Panning
Detune - Fine detune of voices
Vib. Depth - the depth of Frequency LFO. This can be very useful because with the detune settings you can create very good sounding instruments.
R. - enable/disable the resonance effect of a voice
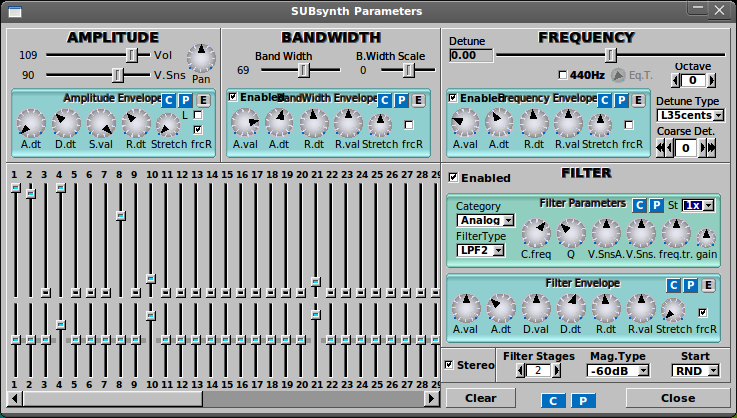
3.9 SUBsynth (SUBnote) Parameters
Vol. - volume of SUBsynth
Pan. - Panning
V.Sns. - Velocity Sensing
Band Width - the bandwidth of each harmonic
B.WidthScale - how the bandwidth of each harmonic is increased according to the frequency. The default (0) increases the bandwidth linearly according to the frequency.
Detune. - fine detune
Category - Filter category: Analog/Formant/SVF
C.detune - coarse detune
Oct. - Octave Shift
Type - set “Detune” and “C.detune” behavior
440Hz - fix the base frequency to 440Hz (you can adjust it with detune settings)
The harmonics settings control the harmonic intensities/relative bandwidth. Moving the sliders upwards increases the relative bandwidth.
Please notice that if you increase the number of harmonics, the CPU usage increases. Right click to set the parameters to default values.
Stereo - make the instrument stereo. The CPU usage goes up about 2 times.
Filter stages - number of filter stages applied to white noise. This parameter affects the CPU usage.
freq.tr - filter frequency tracking
Mag. Type - type of magnitude settings (Linear/dBs)
Start - How to start the filters
Clear - Clear the harmonics settings
3.10 Effects
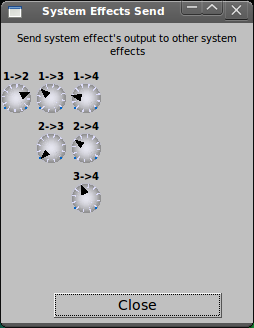
There are 2 types of effects: system effects and insertion effects. The system effects apply to all parts and allows to set the amount of effect that applies to each parts. Also it is possible to send the output of the system effect to other system effects. In the user interface this is shown as “source→destination”. eg. “0→1” means how much of the system effect 0 is sent to system effect 1.
The insertion effects apply to one part or to master out. You may use more than one insertion effect for one part or master out. If you do so the effects with smaller indexes will be applied first (eg. first insertion effect no.0, than no.1, …). If the part selected for insertion effect is “-1” then the effect will be disabled; if the part is “-2” the effect will be applied to Master Out.
Global
Vol - effect volume (how much of the effect is sent to the audio output)
D/W - Dry/Wet mix. “Dry” means unprocessed signal and “wet” means processed signal.
Pan - effect panning
Reverb
Time - duration of late reverb
I.del - initial delay
I.delfb - initial delay feedback (not recommended to use together with low initial delays)
LPF, HPF - LowPass and HighPass filters
Damp - how high frequencies are damped during the reverberation
Echo
Delay - the delay of the echo
LRdl. - the delay between left/right channels
LRc. - the “crossing” between left/right channels
Fb. - feedback
Damp - how high frequencies are damped
Chorus
Freq. - LFO frequency
Rnd. - LFO randomness
LFO type - set the LFO shape
St.df. - the phase difference between LFO for left/right channels
Dpth - LFO depth
Delay - delay of the chorus, if you use low delays and LFO depths this will result in a flange effect
Fb. - Feedback
L/R - how the left/right channels are routed to output:
- leftmost - left to left and right to right
- middle - left+right to mono
- rightmost - left to right, and right to left
Subtract - the output is inversed
Phaser
Freq. - LFO frequency
Rnd. - LFO randomness
LFO type - set the LFO shape
St.df. - the phase difference between LFO for left/right channels
Dpth - LFO depth
Stages - how many times the phase is shifted
Fb. - Feedback
L/R - how the left/right channels are routed to output:
- leftmost - left to left and right to right
- middle - left+right to mono
- rightmost - left to right, and right to left
Subtract - the output is inversed
AlienWah
AlienWah is a nice effect done by me. It resembles a vocal morpher or wahwah a bit, but it is more strange. That's why I called it “AlienWah”. The effect is a feedback delay with complex numbers.
Freq. - LFO frequency
Rnd. - LFO randomness
LFO type - set the LFO shape
St.df. - the phase difference between LFO for left/right channels
Dpth - LFO depth
Delay - amount of delay before the feedback
Fb. - Feedback
L/R - how the left/right channels are routed to output:
- leftmost - left to left and right to right
- middle - left+right to mono
- rightmost - left to right, and right to left
Subtract - the output is inversed
Phase - the phase of the AlienWah
Distortion
Drive - set the amount of distortion
Level - amplify or reduce the signal after distortion
Type - set the function of the distortion (like arctangent, sine)
Neg. - negates the amplitude (invert the signal)
LPF - Low Pass Filter
HPF - High Pass Filter
St. - set the distortion mode (stereo or mono, checked is stereo)
EQ
EQ is a parametric equalizer. On the equalizer graph there are 3 white vertical bars for 100Hz, 1kHz, 10kHz.
Global
Gain - amplifies or reduce the signal that passes through EQ
B. - set the current frequency band (or filter)
Bands
T. - Set the type of the filter
Freq - the frequency of the filter
Gain - the gain of the filter
Q - the Q (resonance, or bandwidth) of the filter
St. - number of additional times the filter will be applied (in order to do very steep roll-off - eg. 48 dB/octave)
DynFilter
3.11 Resonance
The resonance effect acts as a “resonance box” or a filter with arbitrary frequency response. This produces very realistic sounds.
Graph - lets you draw in “freehand” mode
Enable - turn the Resonance effect on
Max - amount of resonance: lower values have little effect. Use the roller below to set it.
C.f - the center frequency of the graph
Oct. - number of octaves the graph represents
Amplification - how the output signal is amplified
Zero - clear the graph
Smooth - smoothen the graph
P.1st - don't allow to the fist harmonic (fundamental freq.) to be damped
InterpP - interpolate the peaks. This allows you to make resonance functions very easily. First, clear the graph using the “Zero” button. Click the left button on a position on the graph. Click the “InterpP” button. It will interpolate automatically between the positions that you pointed (or drew). Also you can clear a part of the graph by dragging with the right mouse button. In fact, the “interpP” button interpolates between non-zero values. If you press the “InterpP” with the right mouse button, the interpolation will be linear, and if you use the left button, the interpolation will be smooth.
RND1,RND2,RND3 - create random resonance functions
Close - closes the window
The cursor location is shown below the graph (the frequency - kHz and amplitude - dB).
3.12 Instrument banks
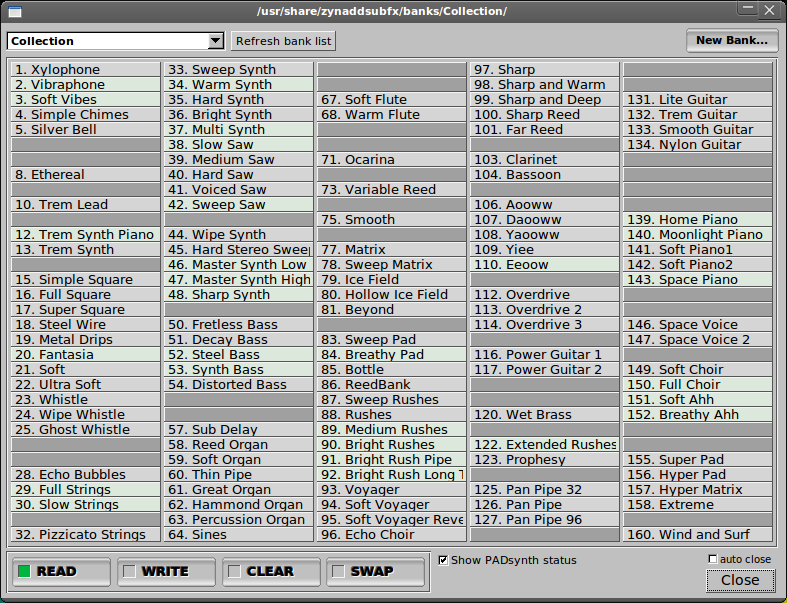
The instruments can be stored in banks. These are loaded/saved automatically by the program, you don't have to worry about saving the banks before the program exits. On program start, the last used bank is loaded. A single bank can store up to 128 instruments.
- A bank has 3 modes:
- READ - the instrument is loaded from the bank to the current part.
- WRITE - the instrument is written to bank
- CLEAR - the instrument from the bank is cleared (removed)
- pressing left mouse button on a slot reads/writes/clears the instrument from/to it (according to the current mode)
- pressing right mouse button on a slot changes its name
Settings
“Load/Use Bank from file…” - load a bank from a file and make it the current bank
“Save Bank…” - save the bank to a file and make the saved file the current bank. It is only useful when you want to copy a bank to a file. Please notice that the current bank is automatically saved when the program exits or when the bank is changed so normally you don't have to save the changes of a bank.
“New Bank…” - create a new bank
auto close - close the window after the instrument is loaded
Close - close the window
If the bank-file is read only, it is shown as “LOCKED” and changing it is not allowed. If you still want to make changes to it, click on “Save Bank…” to save a copy and make the changes on that copy.
3.13 Virtual Keyboard
The virtual keyboard lets you play notes using the keyboard/mouse. There is no MIDI requirement.
Using the keyboard: the keyboard is split into two “octaves”(in fact it is more than 1 octave). It may happen that the keys will not trigger any note-on This is because another widget than the keyboard itself is selected. In order to continue playing using the keyboard, click with the mouse on some keys on the virtual keyboard.
Using the mouse: you can use the mouse too, to play . If you press the shift key while pressing the mouse button, the keys will be not released when the mouse button is released.
If you press the “Panic” button from the ZynAddSubFX main window, all keys will be released.
Functions
Ch. - set the MIDI channel
Vel - set the note-on velocity
Oct - transpose all the virtual keyboard notes
“qwer…” Oct - transpose the upper keys (“qwert”); the range of these keys is from C-4 to A-5 (replace the '5' with the octave)
“zxcvb…” Oct - transpose the lower keys (“zxcvb”); the range of these keys is from C-3 to E-4 (replace the '4' with the octave)
Controller - set the controller to be changed according to Cval
Cval - change the controller value (please notice that the Cval might not reflect the internal value of the controller; this happens when you change the controller)
Pwh - Pitch Wheel, press the “R” button to reset it
Close - close the window
3.14 Configuration window (settings)
Using this window, you can configure some important settings of ZynAddSubFX.
Note: All these settings only take effect after restarting ZynAddSubFX
Sample Rate - set the quality of the sound, higher is better, but it uses more CPU. You can select from a list, or if you want a sample-rate that is not in the list, select “Custom” and change the value from the right. Default is 44100.
Buffer Size - set the granularity of the sound. Default is 256 samples. To find out the internal delay in milliseconds, divide the Buffer Size value by the Sample Rate and multiply the result by 1000 (eg: 256/44100*1000=5.8 ms)
OscilSize - set the number of the points of the ADsynth oscillator. The bigger is better, but it takes more CPU time on start of any note. Default is 512.
Swap Stereo - if the pan positions are reversed, check or uncheck this button
Some of the following settings might be ignored. For example the “OSS Sequencer Device” is ignored, if the ALSA is used for MIDI in (set on compile time), or Linux settings on Windows systems.
Linux
OSS Wave Out Device - set the audio out device (sound-card). Default is “/dev/dsp”
OSS Sequencer Device - set the sequencer (MIDI in) device. Default is “/dev/sequencer”
Windows
MIDI In Dev - set the MIDI in device
WaveOutDev - unused, yet
3.15 Instrument kits
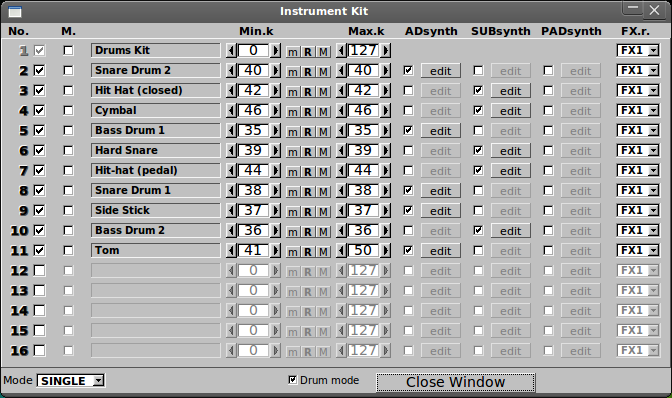
Within this window you can create drum kits, layered instruments, or you can combine more instruments into one.
Kit Mode - enable the kit mode
Protect the kit - when loading an instrument, only item 0 will be changed, other items will remain untouched. This allows you to combine more instruments. If you want to add more instruments to the kit, you have to copy the item 0 to another item, because the item 0 will be replaced. If you load master settings or if you clear the instrument/master setting, the kit is cleared
Swap/Copy - swap two items or copy a item to other item.
The items of the kit are used to make complex instrument. Item 0 is a special type: it cannot be disabled (but it can be muted), to edit it you have to use “ADs edit” or “SUBs edit” from the part window.
No - number of the item
M - mute an item of the kit
Min.k - minimum key of the item of the kit
m/R/M - set the last played note to the minimum(m)/maximum(M) or reset min/max defaults(R)
Max.k - maximum key of the item of the kit
ADsynth - enable and edit ADsynth module of the item of the kit
SUBsynth - enable and edit SUBsynth module of the item of the kit
FX. - choose the Part Effect (PartFX) to process the item (-1 means that is unprocessed).
3.16 Panel Window
The Panel Window allows you to edit some important part parameters (instrument/volume/panning/etc..) and it acts like a mixer. Also, this window shows VU-meters for each part.
To change an instrument, click on the name box of the instrument (see the red arrow pointing towards part 4). Sometimes, if you edit the parameters of the part in the main window, you need to refresh the panel by clicking the Refresh button.
Parameters and buttons
Enable/Disable the part - the check-boxes enable/disable the part
Instrument name - click on this box to change the instrument
The volume bar and the panning dial-button - change the volume and the panning of the part
The counter below the panning dial-button is the MIDI channel that is assigned to the part.
Edit - make the part the current part
4. External Programs
Two external programs are distributed with ZynAddSubFX, but they're not a part of it, because they can be used with any other synthesizer (or MIDI device). Both use ALSA and they must be connected with aconnect or QjackCtl.
4.1 Spliter
This program allows you to play to 2 instruments at the same time, by splitting a MIDI channel to other MIDI channels.
Input Channel - the channel which is being split
Split Note - the notes below it are send to Output Channel 1, and the notes above it are sent to Output Channel 2.
Tr.1(oct) and Tr.2(oct) - transpose the octaves of output channel 1 and 2
4.2 Controller
With this program you can control up to 6 controllers/NRPN's at the same time with the mouse.
The program was written for mice with 3 buttons, so “But.1 X” means X movement (left-right) of button 1 (left ) of the mouse. Right mouse button is “But.3” and middle “But.2”.
“Val.1” and “Val.2” represents the leftmost/rightmost or up/down values (depends on X/Y movement).
5. Controllers and other MIDI messages
I assume that you are familiar with MIDI controllers and NRPN's. The GM controllers received by ZynAddSubFX are:
- Pitch bend
- Modulation wheel (Controller number 1)
- Volume (no. 7)
- Pan (no. 10)
- Expression (no. 11)
- Sustain (no. 64)
- Portamento On/Off (no. 65)
- Filter Q (no. 71)
- Filter cutoff (no. 74)
- All sound off (no. 120)
- Reset all controllers (no. 121)
- All notes off (no. 123)
ZynAddSubFX has controllers that are not defined in GM.
- Bandwidth (Sound control 6) (no. 75)
This increases or decreases the bandwidth of instruments. The default parameter is 64.
- Modulation amplitude (Sound control 7) (no. 76)
This decreases the amplitude of modulators on ADsynth. The default parameter is 127.
- Resonance Center Frequency (Sound control 8) (no. 77)
This changes the center frequency of the resonance.
- Resonance Bandwidth (Sound control 9) (no. 78)
This changes the bandwidth of the resonance.
5.1 NRPN (Non Registered Parameters Number)
They can control all system and insertion effect parameters. For example, you can change the reverb time when playing the keyboard or the LFO frequency of the flanger. You can disable receiving of NRPN control messages by unselecting the “NRPN” check-box in the main window (near the “Master Keyshift” counter).
The controls can be sent on any MIDI channel (the MIDI channels numbers are ignored).
The parameters are:
NRPN coarse (99 or 0x63) sets the system/insertion effects (4 for system effects or 8 for insertion effects)
NRPN fine (98 or 0x62) sets the number of the effect (first effect is 0)
Data entry coarse (6) sets the parameter number of effect to change(see below)
Data entry fine (26) sets the parameter of the effect
You have to send NRPN coarse/fine messages before sending Data entry coarse/fine messages. If the effect/parameter doesn't exist or is set to none, then the NRPN is ignored.
Example (all values in this example are in hex):
B0 63 08 // Select the insertion effects
B0 62 01 // Select the second effect (remember: the first is 00 and not 01)
B0 06 00 // Select the effect parameter 00
B0 26 7F // Change the parameter of effect to the value 7F (127)
Warning: Changing of some of the effect parameters may produce clicks when sound passes through these effects. I advise you to change effect parameters only when the volume of the sound that passes through the effect is very low (or silenced). Some parameters produce clicks when are changed very quickly.
Here are the effects parameter number (for Data entry coarse). The parameters that produces clicks are highlighted in red color. The parameter that produces clicks only when they are changed quickly are highlighted in brown color. Most parameters have a range from 0 to 127. When parameters have another range, it is indicated as [low..high].
Reverb
00 - Volume or Dry/Wet
01 - Pan
02 - Reverb Time
03 - Initial Delay
04 - Initial Delay Feedback
05, 06 - reserved
07 - Low Pass
08 - High Pass
09 - High Frequency Damping [64..127] 64=no damping
10 - Reverb Type [0..1] 0 - Random, 1 - Freeverb
11 - Room Size
Echo
00 - Volume or Dry/Wet
01 - Pan
02 - Delay
03 - Delay between left and right
04 - Left/Right Crossing
05 - Feedback
06 - High Frequency Damp
Chorus
00 - Volume or Dry/Wet
01 - Pan
02 - LFO Frequency
03 - LFO Randomness
04 - LFO Type [0..1]
05 - LFO Stereo Difference
06 - LFO Depth
07 - Delay
08 - Feedback
09 - Left/Right Crossing
10 - reserved
11 - Mode [0..1] (0=add, 1=subtract)
Phaser
00 - Volume or Dry/Wet
01 - Pan
02 - LFO Frequency
03 - LFO Randomness
04 - LFO Type [0..1]
05 - LFO Stereo Difference
06 - LFO Depth
07 - Feedback
08 - Number of stages [0..11]
09 - Let/Right Crossing
10 - Mode [0..1] (0=add, 1=subtract)
11 - Phase
AlienWah
00 - Volume or Dry/Wet
01 - Pan
02 - LFO Frequency
03 - LFO Randomness
04 - LFO Type [0..1]
05 - LFO Stereo Difference
06 - LFO Depth
07 - Feedback
08 - Delay [0..100]
09 - Left/Right Crossing
10 - Phase
Distortion
00 - Volume or Dry/Wet
01 - Pan
02 - Left/Right Crossing
03 - Drive
04 - Level
05 - Type [0..11]
06 - Invert the signal (negate) [0..1]
07 - Low Pass
08 - High Pass
09 - Mode [0.1] (0=mono,1=stereo)
EQ
00 - Gain
All other settings of the EQ are shown in a different way. The N represent the band (“B.” setting in the UI) and the first band is 0 (and not 1), like is shown in the UI. Change the “N” with the band you like. If you want to change a band that doesn't exist, the NRPN will be ignored.
10+N*5 - Change the mode of the filter [0..9]
11+N*5 - filter frequency of the band
12+N*5 - filter gain of the band
13+N*5 - filter Q (bandwidth or resonance) of the band
14+N*5 - reserved
Example EQ setting: Changing the gain of a filter for the second (2nd) band.
Because the bands are counted from 0, the second band is 1 ⇒ N=1. The formula is 12+N*5 ⇒ 12+1*5=17, so the number of effect parameter (for Data entry coarse) is 17.
5.2 Controllers settings window
You can change how much the controllers change the sounds or you can disable/enable some controllers.
Global
PanDpth - panning depth
ModWh - modulation wheel depth
BwDpth - Band width depth
FltQ - Filter Q (resonance) depth
FltCut - Filter Cutoff frequency depth
Expr - enable/disable expression
Vol - enable/disable receiving volume controller
FMamp - enable/disable receiving Modulation Amplitude controller (76)
Sustain - enable/disable sustain pedal
PWheelB.Rng (cents) - Pitch Wheel Bend Range (cents; 100 cents=1 halftone)
Portamento
Rcv. - if the part receives portamento On/Off (65) controller
time - the duration of the portamento
thresh - the threshold of the portamento. It represents the minimum or the maximum of halftones (or hundred cents) in order to do the portamento. The difference is computed between the last note and current note. The threshold refers to the frequencies and not to MIDI notes (you should consider this if you use micro-tonal scales)..
th.type - the threshold type. Checked means that the portamento is done only the difference of frequencies is above the threshold (“thresh”); not checked is for below the threshold.
Resonance
CFdpth - resonance center controller depth
BWdpth - resonance bandwidth controller depth
6. Envelopes
6.1 Introduction
Envelopes control how the amplitude, the frequency or the filter change over time.
6.2 Amplitude Envelopes
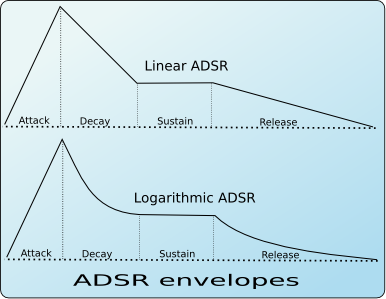
These envelopes control the amplitude of the sound. In ZynAddSubFX, amplitude envelopes can be linear or logarithmic. The next image shows the differences between these envelopes.
The amplitude envelope is divided into:
- Attack - begins at the Note On. The volume starts from 0 to the maximum. In ZynAddSubFX, the attack is always linear.
- Decay - the volume drops from the maximum value to a level called “Sustain level”
- Sustain - the volume remains constant until the key is depressed (Note Off). After this, the last stage take place.
- Release - the volume drops to zero
6.3 Frequency Envelopes
These envelopes control the frequency (more exactly, the pitch) of the oscillators. The following image depicts the stages of these envelopes.
The dotted line represents the real pitch of the sound without the envelope.
The frequency envelopes are divided into 3 stages:
- Attack - begins at the Note On. The frequency starts from a certain value and glides to the real frequency of the note.
- Sustain - the frequency stays the same during the sustain period
- Release - this stage begins on Note Off and glides the frequency of the note to a certain value
6.4 Filter Envelopes
These envelopes control the cutoff frequency of the filters and are divided into:
- Attack - begins at the Note On. The cutoff frequency starts from a certain value and glides to another value
- Decay - the cutoff frequency continues to glide to the real cutoff frequency value of the filter (dotted line)
- Sustain - the cutoff frequency stays the same during the sustain period (dotted line)
- Release - this stage begins on Note Off and glides the filter cutoff frequency of the note to a certain value
6.5 FreeMode envelopes
For all envelope there is a mode that allows the user to set an arbitrary number of stages and control points. This mode is called FreeMode.
The only stage that always remains defined is the Sustain stage. During this stage the envelopes freezes until a Note Off event.
6.6 User interface
All the envelope types have some common controls:
E - Shows a window with the real envelope shape and the option to convert to free mode to edit it
Stretch - How the envelope is stretched according the note. On the higher notes the envelopes are shorter than on lower notes. With the leftmost value, the stretch is zero. The rightmost value uses a stretch of 200%; this means that the envelope is stretched about 4 times/octave.
frcR - Forced release. If this option is turned on, the release will go to the final value, even if the sustain stage is not reached. Usually, this must be set.
The parameters for Amplitude Envelopes for ZynAddSubFX are:
A.dt - Attack duration
D.dt - Decay duration
S.Val - Sustain value
R.dt - Release time
L - If this option is set, the envelope is linear, otherwise, it will be logarithmic
For Frequency Envelopes the interface has the following parameters:
A.val - Attack value
A.dt - Attack duration
R.dt - Release time
R.val - Release value
Filter Envelopes parameters:
A.val - Attack value
A.dt - Attack duration
D.val - Decay value
D.dt - Decay time
R.dt - Release time
R.val - Release value
The FreeMode envelope has a separate window to set the parameters and controls:
Control points - You can move the points using the mouse. In the lower right corner of the windows the total duration of the envelope is shown. A mouse-click on a control point will show the duration of the stage where the point is.
FreeMode - this button activates or deactivates the FreeMode mode.
Add Point - Adds the point next to the current selected point. You can select a point by clicking on it.
Delete point - Removes the point from the envelope.
Sust. - Set the sustain point. The yellow line represents the sustain point.
Str. - Envelope stretch
7. LFO's
7.1 Introduction
“LFO” means Low Frequency Oscillator. These oscillators are not used to make sounds by themselves, but to change some parameters (like the frequencies, the amplitudes or the filters).
LFO's have some basic parameters:
- Delay : this parameter sets the time between the start of the note to the start of the LFO
- When the LFO starts, it has a certain position called Start Phase
- Frequency: the speed of the LFO is (i.e. how fast the parameter controlled by the LFO changes)
- Depth : the amplitude of the LFO (i.e. how much the parameter controlled by the LFO changes)
Another important LFO parameter is the shape. There are many different shapes that can be used as LFO Types. ZynAddSubFX supports the following LFO shapes:
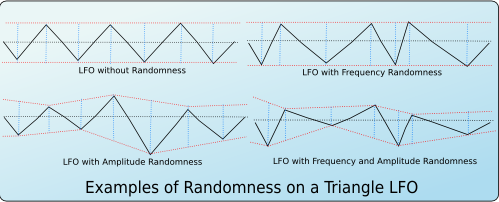
Another parameter is the LFO Randomness. It modifies the LFO amplitude or the LFO frequency at random. In ZynAddSubFX you can choose how much the LFO frequency or LFO amplitude react to this parameter.
The following images show some examples of randomness and how they change the shape of a triangle LFO.
Other parameters are:
- Continuous mode - If this mode is used, the LFO will not start from “zero” on each new note, but it will be continuous. This is very useful if you apply on filters to make interesting sweeps.
- Stretch - It controls how much the LFO frequency changes according to the note's frequency. It can vary from negative stretch (the LFO frequency is decreased on higher notes) to zero (the LFO frequency will be the same on all notes) to positive stretch (the LFO frequency will be increased on higher notes).
7.2 User interface
In ZynAddSubFX, the following LFO parameters are available:
Freq - LFO Frequency
Depth - LFO Depth
Start - LFO Start Phase - If this knob is at the lowest value, the LFO Start Phase will be random.
Delay - LFO Delay
A.R - LFO Amplitude Randomness
F.R. - LFO Frequency Randomness
C. - LFO Continuous Mode
Str. - LFO Stretch - in the image above the LFO stretch is set to zero
8. PADsynth algorithm
8.1 Introduction
This algorithm generates very beautiful sounds, even if its idea is much simpler than other algorithms. It generates a perfectly looped wave-table sample which can be used in instruments. It easily generates sounds of ensembles, choirs, metallic sounds (bells) and many other types of sound.
I want to make this algorithm known and you are welcome to learn and use this algorithm into your projects or products (non-commercial or commercial). You will not be disappointed by this algorithm. This page includes some public domain C/Csources that can be used in your projects/products. This algorithm is implemented in [[http://zynaddsubfx.sourceforge.net/
  * [[http://zynaddsubfx.sourceforge.net/doc/PADsynth/demos/0km.ogg|Bells, Strings and Choir]] (you must listen this one)\\
  * [[http://zynaddsubfx.sourceforge.net/doc/PADsynth/demos/synth_piano.ogg|Synth Piano]]\\
  * [[http://zynaddsubfx.sourceforge.net/doc/PADsynth/demos/piano_saw_choir.ogg|Saw Synth Piano and Choir]]\\
  * [[http://zynaddsubfx.sourceforge.net/doc/PADsynth/demos/phased_choir.ogg|Phased Choir]]
* Without FX. All instruments in this category are "dry". No reverberation, no other effects.
  * [[http://zynaddsubfx.sourceforge.net/doc/PADsynth/demos/noefx_bell_strings.ogg|Bells and Strings]] (you must listen this one, too)\\
  * [[http://zynaddsubfx.sourceforge.net/doc/PADsynth/demos/noefx_organ_choir.ogg|Organ and Choir]]\\
  * [[http://zynaddsubfx.sourceforge.net/doc/PADsynth/demos/noefx_saw_piano.ogg|Saw Piano]] (this example contains the same notes played many times, but with different bandwidth and harmonic profiles)\\
  * [[http://zynaddsubfx.sourceforge.net/doc/PADsynth/demos/noefx_soft_pad.ogg|Soft Pad]]
Parameter files of above examples (for ZynAddSubFX).
=====8.3 Description of the algorithm=====
In order to understand how this algorithm works, you need to be familiar with how I think about the musical instruments. Please read an introduction for the description of the meaning and the importance of Bandwidth of each harmonic and Randomness.
====8.3.1 General description====
This algorithm generates some large wave-tables that can be played at different speeds to get the desired sound. This algorithm describes only how these wave-tables are generated. The result is a perfectly looped wave-table Unlike other synthesis methods which use Inverse Fast Fourier Transform, this one does not use overlap/add methods and there is only one IFFT for the whole sample.
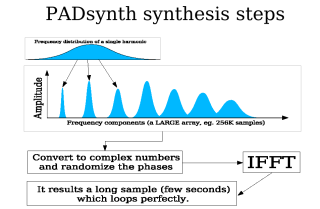
The basic steps are:
- Make a very large array that represents the amplitude spectrum of the sound (all default values are zero)
- Generate the distribution of each harmonic in the frequency spectrum and add it to the array
- Put random phases to each frequency of the spectrum
- Do a single Inverse Fourier Transform of the whole spectrum. There is no need of any overlapping windows, because there is only one single IFFT for the whole sample.
The output is a sample which can be used as a wave-table In the next image, the steps are represented graphically:
 ===8.3.1.1 The bandwidth of each harmonic===
I consider one harmonic (overtone) as being composed of many frequencies. These sine components of one harmonic are spread over a certain band of frequencies.
Higher harmonics have a wider bandwidth. In natural choirs/ensembles the bandwidth is proportional to the frequency of the harmonic.
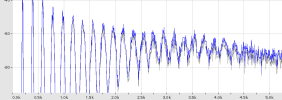
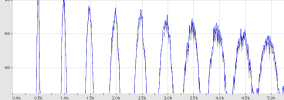
Here is an example of a spectrum of an instrument generated by ZynAddSubFX:
|
  |
|  |
| full spectrum | close-up of the spectrum |
The harmonics becomes wider and wider, until a certain frequency, where they may merge into a noise band (as in the full spectrum image from above shows). This is a normal thing and I recommend to not avoid this by limiting the bandwidth of the harmonics.
===8.3.1.2 The frequency distribution of one harmonic/overtone (or the harmonic profile)===
This describes the function of the spread of the harmonic.
Here are some examples of how they can be spread:
- A special case is where there is only a single sine component inside the harmonic In this case, the harmonic and the “sine component” are the same thing.
|
| full spectrum | close-up of the spectrum |
The harmonics becomes wider and wider, until a certain frequency, where they may merge into a noise band (as in the full spectrum image from above shows). This is a normal thing and I recommend to not avoid this by limiting the bandwidth of the harmonics.
===8.3.1.2 The frequency distribution of one harmonic/overtone (or the harmonic profile)===
This describes the function of the spread of the harmonic.
Here are some examples of how they can be spread:
- A special case is where there is only a single sine component inside the harmonic In this case, the harmonic and the “sine component” are the same thing.

Audio example: single harmonic, many harmonics
- Detuned. In this case there are two sine components which are detuned.

Audio example: single harmonic, many harmonics
- Evenly spread inside the harmonic (all components has the same amplitude).

Audio example: single harmonic, many harmonics
- Normal (Gaussian) distribution. The sine components amplitude are bell shaped. The largest amplitude is in the center of the band. This distribution gives the most natural sounds (it simulates a very, very large ensemble).

Audio example: single harmonic, many harmonics
Of course, you can use many other profiles of the harmonic. ZynAddSubFX's PADsynth module offers many ways to generate the harmonic profile.
Also, it's very important that the harmonic must have the same amplitude, regardless of the profile functions/parameters and the bandwidth.
===8.3.1.3 The phases of the sine components of the harmonics===
This algorithm considers the phases of the sine components of each harmonics as random.
====8.3.2 Steps, input and output of the algorithm (with pseudo-code)====
===8.3.2.1 Steps of the basic algorithm===
Input:
N - wave-table size. It's recommended to be a power of 2. This is, usually, a big number (like 262144)
sample-rate - the sample-rate (eg. 44100)
f - frequency of the the fundamental note (eg. 440)
bw - bandwidth of first harmonic in cents (eg. 50 cents); must be greater than zero
number_harmonics - the number of harmonics. Of course, number_harmonics<(sample-rate/f)
A[1..number_harmonics] - amplitude of the harmonics
Output:
smp[0..N-1] - the generated wave-table
Internal variables:
freq_amp[0..N/2-1] = {0,0,0,0,…,0}
freq_phase[0..N/2-1], etc…
Functions:
RND() returns a random value between 0 and 1
IFFT() is the inverse fourier transform
normalize_sample() normalizes samples
profile(fi,bwi){
x=fi/bwi;
return exp(-x*x)/bwi;
};
Steps:
FOR nh = 1 to number_harmonics

 	bw_Hz=(pow(2,bw/1200)-1.0)*f*nh;

 	bwi=bw_Hz/(2.0*sample-rate);

 	fi=f*nh/sample-rate;

 	FOR i=0 to N/2-1

 	 hprofile=profile((i/N)-fi,bwi);

 	 freq_amp[i]=freq_amp[i]+hprofile*A[nh];
ENDFOR
ENDFOR
FOR i=0 to N/2-1

   freq_phase[i]=RND()*2*PI;

 ENDFOR


 smp=IFFT(N,freq_amp,freq_phase);

 normalize_sample(N,smp);


 OUTPUT sm
p
===8.3.2.2 The extended algorithm===
The differences between the extended algorithm and the basic algorithm are minor:
There is an additional parameter:
bwscale: specifies how much the bandwidth of the harmonic increases according to its frequency. Also, it defines a function called relF(N) which returns the relative frequency of the N'th overtone. It allows to generate detuned harmonics or even metallic sounds (like bells).
The difference with the basic algorithm is at the computation of bw_Hz and fi:
bw_Hz=(pow(2.0,bw/1200.0)-1.0)*f*pow(relF(nh),bwscale);
If the relF(N) function returns N and the bwscale is equal to 1, this algorithm will be equivalent to the basic algorithm.
===8.3.2.3 Example Graph of freq_amp array:===
Graphs of the (basic algorithm) freq_amp array for N=262144, f=500 Hz, bw=100 cents, sample-rate=44.1 Khz, and A[] where A[n]=1.0/sqrt(n)
|
fi=f*relF(nh)/sample-rate;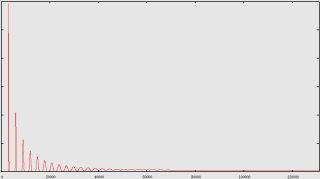 |
| 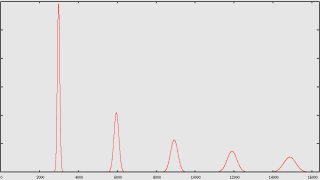 |
| Graph of the full array | Closeup of the graph of the array |
===8.3.2.4 Example of the output of this algorithm (c_basic implementation)===
c_basic_sample.ogg - this is the resulting smp array converted to ogg vorbis.
====8.3.3 Public domain C/C code that shows a simple implementation====
|
| Graph of the full array | Closeup of the graph of the array |
===8.3.2.4 Example of the output of this algorithm (c_basic implementation)===
c_basic_sample.ogg - this is the resulting smp array converted to ogg vorbis.
====8.3.3 Public domain C/C code that shows a simple implementation====
I wrote some C/Cimplementations of the basic algorithm and the extended algorithm. The "c_basic" directory contains the basic algorithm, "c_extended" contains the extended algorithm and the "c_simple_choir" is the implementation of the basic algorithm to make a simple choir. These implementations were written to be easy to understand and they are not optimized for speed. You can test on Linux by running the ./compile.sh scripts. It's recommended to have [[http://ccrma.stanford.edu/software/snd/ class that implements the algorithm (ready to use)====
To be easy to use this algorithm into your projects or products, I made a ready-to-use Cclass. Only thing that you have to do, is to provide it an IFFT routine. Please read the header file for details.
[[http://zynaddsubfx.sourceforge.net/doc/PADsynth/implementation/PADsynth_implementation.zip code from here]]
8.4 Tips and suggestions
- Keep in mind that the resulting wave-tables are perfectly looped
- When using the wave-tables for instruments, on each NoteOn, start from a random position and not from the start. This avoids hearing the same sound on each keystroke
- You can use the same wave-table for generating stereo sounds, by playing the same wave-table at different positions for left and right. The best is to create a difference between left right of N/2
- Generate different wave-tables for different pitches and use the one that is closest to the desired pitch
- Upsample or downsample the amplitude array of the harmonic before running the algorithm, according to the fundamental frequency. In this case we need to set a parameter “base_frequency” which represents the frequency where the array is left unchanged.
Example: we have A_orig[]={1,2,1,3,0,0,1,0} and base_frequency is equal to 440 Hz
Here are some cases:- A[] for 440 Hz: is the same as A_orig[]
- A[] for 220 Hz: is the A_orig[] upsampled by factor of 2
so: A[]={1, 1, 1.5, 2, 1.5, 1, 2, 3, 1.5, 0, 0, 0, 0.5, 1, 0.5, 0}
(the original A_orig amplitudes are shown as bold)
- A[] for 880 Hz: the A_orig[] is downsampled by a factor of 2
so: A[]={1.5, 2, 0, 0.5}
- A[] for F Hz: the A_orig[] is scaled by a factor of 440/F.
Even if this idea is very simple, the resulting sounds are very natural, because it keeps the spectrum constant according to the frequency of the harmonic and not to the number of the harmonic. This follows the point 4 from the document where I described some principles regarding synthesis.
8.5 Conclusions
I hope that this algorithm will be implemented in many software/hardware synthesizers. Use it, spread it, write about it, create beautiful instruments with it. If your synthesizer uses plenty of samples, you can use this algorithm to generate many ready-to-use samples.
This algorithm, this page, the images, the implementations from this page, the audio examples, the parameter files from this page
are released under Public Domain by Nasca Octavian Paul.
e-mail: zynaddsubfx AT yahoo DOT com


